CREATOR Gateway
CREATOR supports the execution of RISC-V programs in real hardware devices.
Info
We also support our predefined RISC-V system calls.
Supported devices
CREATOR supports Espressif ESP32 development boards and RISC-V SBCs.
Espressif ESP32
Espressif's family of ESP32 MCUs.
esp32c3- ESP32-C3-DevKitC-02 (JTAG, no port)
- ESP32-C3-DevKitM-1 (no JTAG)
esp32c6- ESP32-C6-DevKitC-1 (JTAG + port)
- ESP32-C6-DevKitM-1 (JTAG + port)
esp32h2- ESP32-H2-DevKitM-1 (JTAG + port)
These use the creator-gateway-esp32.
Single-Board Computers
RISC-V SBC boards with Linux that can run SSH and GDBGUI. At the moment, SBC RISC-V boards with Ubuntu 24.04.3 for RISC-V fulfill these requirements.
- OrangePi RV2: 8 RISC-V cores, Wi-Fi and Bluetooth conection
- Nezha D1-H 64 bit RISC-V: Single-core RISC-V64. It does not offer Wi-Fi connection or a GUI
These use the creator-gateway-sbc.
Executing the ESP32 gateway
Docker execution
This is the recommended way of executing the gateway on Windows, Linux, or macOS.
For more information, see the IDF documentation.
Windows
- Install Docker Desktop
- Connect your device and check which port it belongs to. You can do this with the
modeterminal command, or in the Device Manager. The default port isCOM3. -
Set up the Remote Serial Port:
- Download and unzip esptool
- Run
esp_ffc2217_serverin the device's port (e.g.COM3):
-
Run the container:
docker run --rm --name creator-gateway-esp32 -it --init -p 8080:8080 -p 5000:5000 --add-host=host.docker.internal:host-gateway creatorsim/creator-gateway-esp32:latestTip
You can also use a Docker compose file (
compose.yaml):-
Create the following
compose.yamlfile: -
Deploy the docker compose in the directory of the YAML file:
Take into account that
docker compose upis not interactive, therefore the program won't be able to read the keyboard inputs. You can rundocker compose up -dand then attach to the specific container (check its name/id withdocker ps) withdocker attach <container>. -
Linux/macOS
- Install Docker engine (or Docker Desktop)
- Connect your device and check which port it belongs to. It typically resides in
/dev/, e.g./dev/ttyUSB0. You can quickly check it withls /dev/ttyUSB*(Linux) orls /dev/cu.usbserial-*(macOS). -
Run the container:
docker run --rm --name creator-gateway-esp32 -it --init --device=/dev/ttyUSB0 --add-host=host.docker.internal:host-gateway -p 8080:8080 -p 5000:5000 creatorsim/creator-gateway-esp32Tip
You can also use a Docker compose file (
compose.yaml):-
Create the following
compose.yamlfile: -
Deploy the docker compose in the directory of the YAML file:
Take into account that
docker compose upis not interactive, therefore the program won't be able to read the keyboard inputs. You can rundocker compose up -dand then attach to the specific container (check its name/id withdocker ps) withdocker attach <container>. -
Setting up the debugger
The debugger is only available in boards with JTAG, and both USB and SERIAL ports must be connected to the computer.
Tip
For boards without the secondary port on the board, but with JTAG support, you can wire a USB-to_Dip as such:
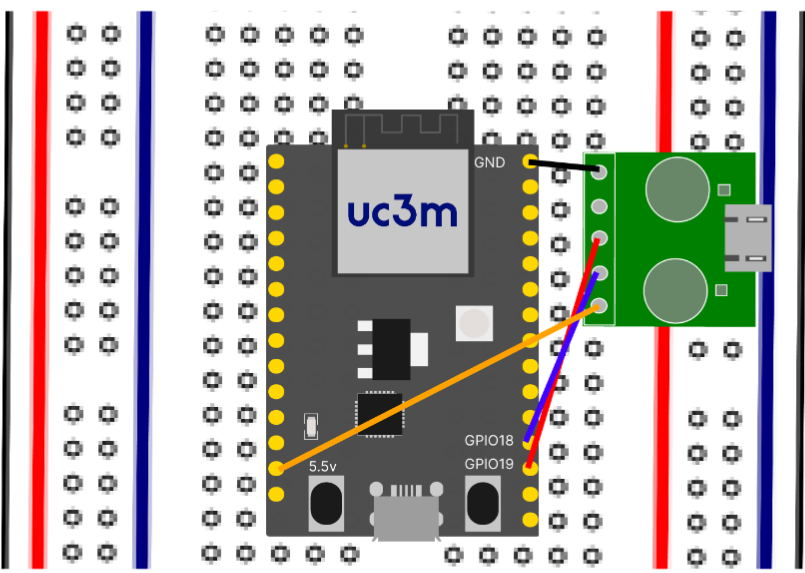
USB-to-DIP wiring for boards with JTAG support.
Linux/macOS
- Setup OpenOCD
- Download OpenOCD with ESP32 JTAG support v0.12.0-esp32-20241016 (for your OS and architecture) and unzip it
-
Add the
bin/folder to your PATH, e.g.: -
Set the
OPENOCD_SCRIPTSenvironment variable:bash export OPENOCD_SCRIPTS="/full/path/to/openocd-esp32/share/openocd/scripts" -
Execute the
openocd_start.shscript (inside theopenocd_scriptsfolder in our driver) with the type of device (e.g.esp32c3) -
After the container confirms that GDBGUI is up and running, access the web interface at http://localhost:5000
Windows
- Install and setup Zadig
-
List all the devices in
Options>List All Devicesand selectUSB Jtag/serial debug unit (Interface 2)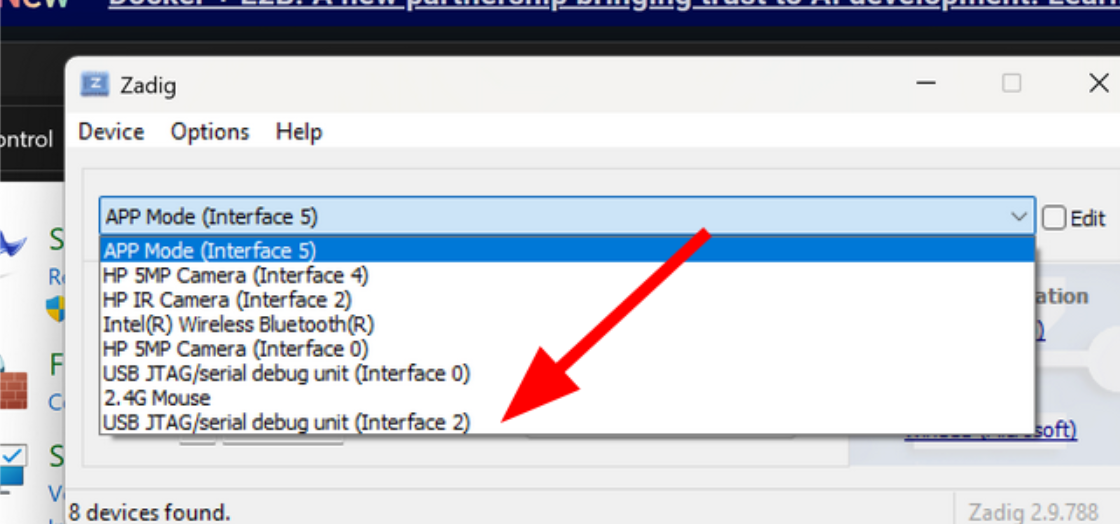
Selecting the device in Zadig.
-
Downgrade the driver
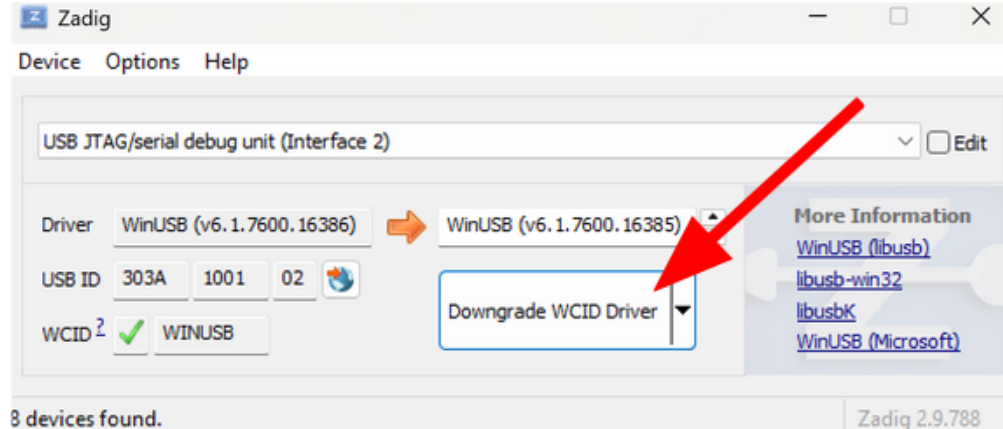
Downgrading the device driver in Zadig.
-
Setup OpenOCD
- Download OpenOCD with ESP32 JTAG support v0.12.0-esp32-20241016 (for your OS and architecture) and unzip it
-
Add the
bin\folder to your PATH, e.g.: -
Execute the
openocd_start.batscript (inside theopenocd_scriptsfolder in our driver) with the type of device (e.g.esp32c3)
-
After the container confirms that GDBGUI is up and running, access the web interface at http://localhost:5000
Native execution (Linux-only)
You can run the gateway natively on your Linux device.
-
Install Python 3.9
-
Install the ESP-IDF framework v5.3.2
- Follow the instructions from Espressif's documentation.
- To ensure Python 3.9 is used for the installation, first create a virtual environment in
~/.espressif/python_env/idf5.3_py3.9_en, and activate it, before executing theinstall.shscript.
-
Download and unzip the ESP32 gateway
-
Install the python dependencies
-
Use the
install.shscript from ESP-IDF -
Install the Python dependencies with pip (move to the downloaded folder):
-
-
Load the ESP-IDF environment variables (
export.sh) - Execute the gateway web service:
Setting up the debugger
You must set up ports permissions for the JTAG. Your user must be in the plugdev and dialout groups (in Ubuntu/Debian/Fedora), or uucp (in Arch Linux).
You can add yourself to the group with usermod, e.g.:
Another error might occur: gdb_exception_error -- libusb_bulk_write error: LIBUSB_ERROR_NO_DEVICE.
This problem happens because the user doesn't have permission to write to
the JTAG USB device, located in /dev/bus/usb/003/XXX (where XXX is a
pseudo-random number).
You can check this by doing:
total 0
drwxr-xr-x 2 root root      180 Oct  1 11:03 .
drwxr-xr-x 6 root root      120 Oct  1 10:36 ..
crw-rw-r-- 1 root root 189, 256 Oct  1 10:41 001
...
crw-rw-r-- 1 root root 189, 256 Oct  1 10:41 022
You can see the user and group are root.
To change this, we can configure udev so that, when it mounts the JTAG
device it gives it the group permissions it typically gives to all other
devices (uucp for Arch, dialout for Ubuntu).
Tip
To see the device's ID, run lsusb:
...
Bus 003 Device 018: ID 10c4:ea60 Silicon Labs CP210x UART Bridge
Bus 003 Device 022: ID 303a:1001 Espressif USB JTAG/serial debug unit
...
Therefore, the vendor ID for the JTAG is 303a, and the product ID is 1001, and for the UART 10c4 and ea60.
Create a new /etc/udev/rules.d/99-Espressif.rules file (with sudo!):
-
For Ubuntu/Debian/Fedora:
-
For Arch Linux:
For more information, see the JTAG documentation.
Executing the SBC gateway
Tip
Recommendations for a correct SBC setup:
- Use the recommended power supply for your SBC
- Use a good Ethernet Cable
- Use a Class 10 MicroSD card from a recognizable brand from Amazon or another reliable retailer
- Install the OS following the SBC manufacturer's instructions
- Create the default folder where your CREATOR projects will be saved, e.g.
~/creator -
Ensure you provide the correct rights to the directory
-
Connect the SBC to the Internet via Ethernet or Wi-Fi if possible. !!! tip Depending on the SBC's configuration, its IP may change from time to time. Check its private IP with
ip abefore each use. An example IP would be10.117.129.219. -
Check the SSH service status:
-
Check your username with
whoami. Typically, it'subuntu. -
Connect to the SBC from your computer via SSH:
-
Download and unzip the SBC gateway in the SBC
-
Set up the gateway (inside the gateway folder):
-
Create a new Python virtual environment:
-
Install the dependencies:
-
-
Install the RISC-V Cross-Compiler on your macOS, Linux or Windows with WSL device
- Execute the gateway
User Interface
The Target Flash menu can be accessed from Tools → Flash in the simulator view.
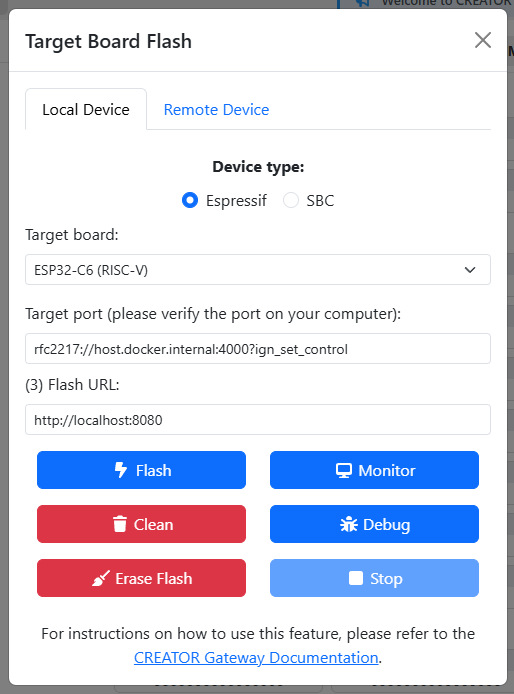
ESP32 Gateway Target Flash user interface.
First, select your device type (ESP32 or SBC) and target board.
Then, provide the target information:
- ESP32
- Target port: Port of the device's UART connection.
The default values are:
- Linux:
/dev/ttyUSB0 - macOS:
/dev/cu.usbserial-10 - Windows:
rfc2217://host.docker.internal:4000?ign_set_control
- Linux:
- Target port: Port of the device's UART connection.
The default values are:
- SBC
- Target user: User and IP address of the SBC (
<user>@<ip>) - Target location: Location of the project folder (e.g.
~/creator)
- Target user: User and IP address of the SBC (
Finally, provide the flash URL, the URL address of the gateway. By default, https://localhost:8080.
Buttons
- Flash: Builds and flashes CREATOR's program into your development board.
- Monitor: Executes development board's flashed program. It can be stopped by using the "Stop" button or the keyboard shortcuts
Ctrl+]orCtrl+t+x. - Debug: If it's setup correctly, it will open another tab with an instance of GDBGUI ready to execute programs step-by-step
- Clean: Erases gateway's copy of the program
- Erase-flash: Erases the device's program